Scratch-building for beginners - page 2
Once the adhesive has dried, you must cut the pieces out of the subsrtate. There are two ways to make your walls meet at the corners: butt joints or mitered joints.
For butt joints, simply cut the pieces out using a SHARP blade in your hobby knife and a straightedge to ensure - duh - straight edges.
Note - and trust me on this: a dull knife can lead to serious injury; I cut the tip of my left index finger almost completely off when a knife with a "dull" blade slipped while I was attempting to cut window glazing material (a different project from this one). The blades get too dull to cut materials - but they are not too dull to cut you!
For mitered joints (which look better, but are harder to make), use a tool such as the Logan 2000 push-style mat cutter, or the X-Acto X7747 Foam board cutter, which has a 45-degree snap-on adapter. Either one will result in 45-degree mitered (beveled) edges. Use a straightedge to guide whichever tool you use, and stand up while making the cuts to get proper pressure on the straightedge; if you try to cut mitered edges while sitting down the straightedge will have a tendency to rotate, resulting in wavy cuts - which will result in improperly-meeting walls and, therefore, a useless wall and wasted wood.
|
|
||||
If you do wish to make mitered joints, you should split the substrate lengthwise to separate the rows of pattern pieces so that when you cut out the walls using the selected cutting device (Logan or X-Acto) you don't accidentally cut into another pattern piece. I used the Logan 2000, available from Walmart.
 |
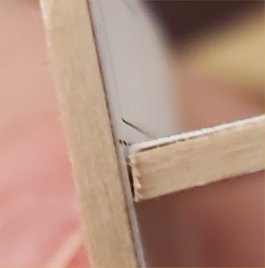
To make the miter cuts, place a straightedge along the appropriate edge of the pattern piece and bear down HARD on the straightedge to prevent it from slipping during the cutting process. Also, when cutting, make several light passes with the cutting tool, rather than one heavy pass; this helps to ensure that the cut is straight and that the straightedge doesn't slip while cutting.
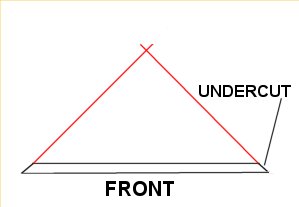
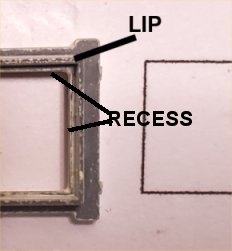
Finally, be sure that you are undercutting the pattern piece so that the mitered edge slopes inward toward the back; when you have properly cut both mitered edges of a piece, imaginary lines drawn from each edge should intersect at a point behind the piece.
 |
Once all pattern pieces have been cut out of the substrate, write the letter or number of each piece on its back for future reference; the construction process involves covering the front of each piece with siding material prior to final assembly, so the letters and numbers will no longer be visible.
Next come the windows and doors. In order to have an attractive model you must fit each window and door individually, which means no "cookie cutter" approach to making openings in the walls. Begin by making the top cut in each opening. Except for rare occasions, windows are aligned so that their tops are all in line with each other.
Here is the list of remaining parts and materials for the house (the photos are not all in scale):
| ITEM | IMAGE | SOURCE | ITEM # | INITIAL OPENING |
|---|---|---|---|---|
| Window, lower level |  |
23/64" x 13/16" | ||
| Window, upper level |  |
Tichy Train Group | 3/8" x 5/8" | |
| Door, front | 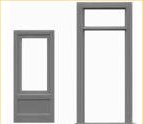 |
Tichy Train Group | 8116 | 15/32" x 1-1/8" |
| Door, rear | 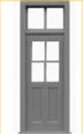 |
Tichy Train Group | 8033 | 5/16" x 1-1/8" |
| Window, cellar |  |
Tichy Train Group | 8229 | 5/16" x 1/8" |
| Shutters, small |  |
Tichy Train Group | 8039 | |
| Shutters, large |  |
Tichy Train Group | 8040 | |
| Porch posts | 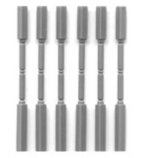 |
Tichy Train Group | 8092 | |
| Turned spindle porch raiings | 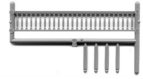 |
Tichy Train Group | 8093 | |
| Chimney | 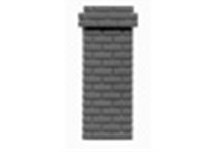 |
Tichy Train Group | 8123 | |
| HO scale basswood stair stringers | 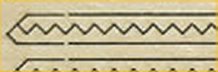 |
Rail Scale Models | RSM-D3002 | |
| Ribbed (standing-seam) "tin" roofing |  |
Builders In Scale | 532 | |
| Cedar shake siding |  |
Rail Scale Models | RSM-D5007 | |
| Foundation walls |  |
Walthers | 933-3522 |
I used a standard ruler to mark the window/door openings. I also cut a little skimpy so the window/door didn't quite fit, then I fine-tuned the cutout until the window/door fit perfectly (the measurements given under "Initial Opening" are shy of the final opening size. Avoid the temptation to initially cut the openings full size, only to fit a window or door and find that you've made the opening too large; you can always trim more wood from an opening - you can't put any back).
|
|
|
|
||||||||
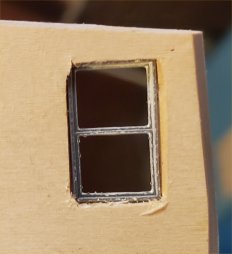
Start cutting each openeing with a cut across the top. Follow this with the two side cuts, being sure to keep the side cuts perpendicular to the top cut (if you don't, the window/door will fit cock-eyed in the opening and - once again - you will have wasted a wall and the wood it's made from).
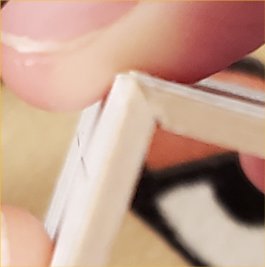
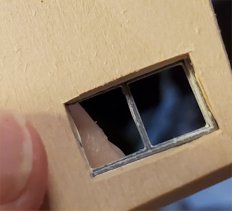
Finally, connect the two side cuts with the bottom cut, which should be the same width as the top cut. CAREFULLY push on the back of the cutout to remove the scrap piece of wood; if the scrap piece doesn't come out easily, re-cut all cut lines one or two times and then remove the scrap piece of wood. BE SURE to skimp on the initial cutout and then go back and fine-tune it; if you don't skimp on the initial cutout, you can end up with a cutout that's too large for the window or door, as shown in "Too much cut away". This was not done on purpose to prove a point - it was but one of many mist--, er, "learning experiences", I had.
| Previous | Next |